Saturday, 8 October 2011

Simple Jersey Spotted Dress

Like the pattern before I decided to make another dress with a circle skirt. However I wanted to try challenging myself and use a fabric I hadn't used before, stretch jersey. I hadn't decided on the bodice part but I knew I wanted short sleeves so that did limit my options as such.

I started with the quarter circle skirt, did want a half circle but didn't actually have enough fabric! Once I had made the skirt I started to think about the bodice and just made a generic bodice from my blocks and though when I had that sewn together and on the mannequin it would make it easier to see what kind of bodice I wanted.

I then made some simple short sleeves and sewed them onto the bodice too. I started to manipulate the bodice by chopping off the sleeves to make them shorter and so more like cap sleeves, then I proceeded to cut down into the neckline giving it a more desirable neck shape. I made it into a sweetheart neckline and a small scoop at the back of the bodice. Pleased with my design I started to sew the bodice and the skirt together, and because the fabric was a stretch Jersey there were no need for buttons or zips, simply put it over your head!


Front View of Dress

 Back View of Dress


Sweetheart Neckline


Detail of Sleeve

Mint Green Halterneck Dress

I struggled a bit with this dress as I couldn't find the right pattern in my book for it so instead I decided to find one on the Internet. I found the top half of the halterneck and started to make this, however half way through I realised this was not going to turn out right as it was just too complicated and I didn't really know what I was doing with it! So I had to go back to the drawing board....the Internet!! Finally I found another pattern I could use for my pattern drafting and went from there. It was a bit of a challenge and looking at the fabric I had just cut out I saw that I needed to gather the bust part of it and unfortunately I couldn't fill it out with my own bust :(

Once I had nailed the bodice of the dress I figured I'd need to put it a waistband to attach the bodice and the skirt together. I just made up a width for the waistband and made sure it was the same all the way around. Luckily it seemed to work itself out and so i just finished it by putting a white zip at the back! I was determined to have it finished by the Friday of that week because my boyfriend had an amazing 1 year anniversary surprise for me and so I wanted to look the part :)

In detail

Just in my living room

Same as above

Sunday, 11 September 2011

50s Gingham Tie Shirt

I had a lot of fun making this shirt it was quite simple and again I used gingham but this time baby blue as I thought this was kitch and very 50s. I used the classic shirt pattern to draft and then just cut this off at the waist and extended the front part of the shirt down to the hips curving this into the buttons stand to create the tie. i used a traditional shirt collar which I found simple to make once I understood how to do so. I got inspiration from these shirts in fashion at the moment so went round High Street shops to look at the garments and understand the finishing to them. I finished by adding again, a little lace trim around the collar to add a bit of something special. I apologise for the photos by this was just a quick photo I did when I happened to be going out wearing this. 


Front View Outside my Flat


A Bit of a Side View


In Detail

Comments appreciated!!

50s Gingham Shirt Dress

Inspired by Betty Draper from Mad Men I wanted to make a classic fifties sleeveless shirt dress made from a traditional gingham material with a cute peter pan collar. I found this dress pretty tricky to make as I haven't made a shirt before. I used a classic shirt pattern from my book to draft the pattern and then mixed and matched different pattern drafting together. Again I just gathered the shirt so that was pretty simple but I had to make a button stand which was new for me again! I found this slightly tricky as I had to make sure I had enough buttons going up the shirt so that people wouldn't be able to see my bra........or worse! I was also inspired by a lady sewer on sew retro who made a baby blue shirt dress which looked really cute and very well made. I decided I wanted it to look cute and so thought putting a bit more of detail on it would add a special touch to it, so I just sewed a pretty lace trimming around the hem of the dress. Unfortunately I haven't taken photos of this properly so it's just one of my mannequin for now, better photos to follow!


This is Only in the Making but better pictures to follow

Classic Blouse and Pencil Skirt

I drafted both of these patterns from my pattern drafting book and so I had a lot if guidance there.

 As this was the first time I had made a blouse and used a voile material to do so I found this very challenging, the material slipped about everywhere and bunched up as I was sewing. I had to put the make a new yoke as the first one wasn't big enough and attaching this onto the gathered back was pretty tricky. I also messed up the sleeves as I used a different sleeve pattern from the one suggested and got pretty confused!

I am not that sure about the final result but you always learn from your mistakes so when I come to make another blouse I'm going to take on board all my challenges and difficulties and try to improve my next blouse taking these all on. I am also going to try and find a little vest top of the same kind of colour to go underneath as I think with my skin tone the bright blue is too much to be seen with just a bra.

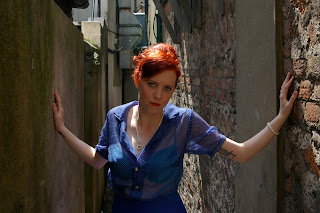
The skirt was a lot simpler as I used a suiting type of material and so was easier to machine sew. I actually got the skirt pattern from a website I found that just happened to have instructions on how to draft a pencil skirt as again I couldn't find one in in my book. I used these instructions, made my patterns and found it all very simple to construct, I used a concealed zip at the back of the skirt which works very well. I also think that it is a very flattering skirt and I feel great in it! Below are the pictures:


Found a pretty cool alleyway in the lanes and so used this for a photo opportunity


Up against the wall of Dolly Dagger


Detail of Blouse in Alleyway


Detail of Back of Blouse against Dolly Dagger

    
Detail of of both garments with a cool looking over the shoulder pose.

Any comments welcome....

Actual First Dress

This dress was made very simply from the shift pattern in my book named winifred Aldridge 'Metric Patterns for Women's Wear' 5th Ed. I try to use this book as much as I can and use it as a guideline when I can't find the patterns I am looking for.

Not actually a lot to say about this dress I thought I would use an interesting anchor and stripe material I found as it was a bit different and thought it would stand out. For some werid reasons I found this pattern quite hard to draft but I think that's just because this was the first proper dress I had made from pattern drafting and so it was a bit hard to get my head around but now seems pretty easy now I think about it. I suppose it's just one of those things you have to get used to then it clicks and it all becomes clear! I think this dress worked out pretty well and I have worn it out a few times on the town! photos below


Near the Pier on the Beach


Back of Dress...looking out to sea


Back of Dress in More Detail


Front of Dress in More Detail


All comments welcome!

Another post......Finally! First Dresses

Hi guys, sorry I haven't posted in ages but my laptop got stolen so all my photos i had to retrieve from my camera so they aren't as good as I would like!

Anyways I have been a very busy bunny and have made manya things. the first I am going to show you is a summer dress, made from my block patterns again. it's baby pink fabric with small darker pink flowers, all very kitch! I always get my fabric from fabric land as it's pretty cheap and I'm on a low budget right now! They also do a variety of different fabric patterns so it's useful to make your collection look very different.

I couldn't find a pattern for drafting these type of dress so decided to be inventive and use an underwear pattern with vertical seams and then just gathered the skirt and put it on the bottom. I unfortantley forgot that there weren't any openings on the bodice left for a zip, luckily i had left lots of extra fabric as this was one of my first dresses and so I could squeeze it into the back. I then finally hemmed it all and added thin straps at the top of the bodice. I pretty pleased with it and love how kitch the fabric is! This was actually the second dress I made so the first one will follow this post! Pictures below:


  Front View


Back View


Detail of Summer Dress


All comments appreciated, thanks!

Tuesday, 2 August 2011

Fasinators in Detail

Above is the first fascinator I made. Just simply blue felt surrounded by a blue bound fabric, with peacock feathers and finished with a lovely little pink bow and hat netting. These are all set on a comb.


Above was made with a stiffened fabric inbetween and the fabric sew on the top. It is surrounded by purple ribbon that is sew on and finished with buttons, white peacock feathers and white hat netting.

This one above was pretty much the same technique as the first but a lot harder, so ended up looking more like an arrow then a bird! It is finised with peacock feathers and roses wrapped around them with hat netting over the top.

I decided on some green felt and contrasting white peacock feathers for this piece. I finished it again with a red ribbon this time and a cool vintagey looking button with white hat netting again.

Sunday, 31 July 2011

My very first blog!

Once I moved to Brighton I had lost all connection with the art scene that I had when I was in Reading so I decided to make some hair accessories, which I had tried out when I was in Reading a ran a class in making vintage hair accessories but I wan't to go further and make fascinators! I had a look around all the shops, researching what they were made from and so gathered my materials and my idea and went away at sewing a creating my small master pieces!

I have to admit I had a lot of fun but it was hard work to and I learnt a lot along the way. I felt that gathering a lot of materials I already had and postioning them in a certain way along with new bits and bobs really helped to create a unique look.


I was lucky enough to be able to convince someone to sell them in their shop/gallery space, called Studio 51 in Kemp Town which is pretty cool!